Support
List Of Content
-
1. Setting up Training Wireless Headset
-
2. Audio Settings for USB Headsets
-
3. Programming Mitel Phone for Headsets
-
4. Compatible Phones for Yealink WH6x Wireless
-
5. Yealink Ring Settings
-
6. Upgrading Firmware on Yealink phones
-
7. Disabling Auto Answer on Yealink
-
8. Importing a CFG File for Yealink T33 series
-
9. Setting Volume level on Polycom Phones
-
10. Fixing audio Screech on Truvoice Headsets
-
11. Retaining volume on Yealink Desk Phones
1. Setting up Training Wireless Headset
2. Audio Settings for USB Headsets
Sometimes on TruVoice USB headsets your PC will not recognize this device and you will need to change the Microphone and speaker to Truvoice USB Headset in your PC settings, see how to this below.
1. Connect your headset to the USB bottom half cable making sure it is pushed all the way in.
2. Plug the USB part into any USB port in your PC
3. If you have no sound in your earpiece then you will have to change your settings.
4. Go into your PC "Settings".
5. Select "System".
6. Select "Sound"
7. Select the "Output" and "Input" in the drop down box to "VoicePro USB" (see Diagram below)

3. Programming Mitel Phone for Headsets
Getting your Headset to work on Mitel Phones can be tricky and this is due to certain phones not having a designated headset key to press when answering calls. Below we have included 2 ways in which you can program your corded headset to work on Mitel so if the version 1 does not fix the issue please try version 2.
Programming Mitel phone (Version 1)
If you are using a corded Headset from Truvoice, Jabra or Plantronics on a Mitel phone and don’t have a headset button pre-programmed on your phone, then you will need to manually assign and program a key on a blank multi-function key. (Blank is in the center of the phone console.
Programming Mitel phone to use a Corded Headset (Version 1)
Step 1: Dial 397
Step 2: Select a blank multi-function key
Step 3: Dial 317 to enable headset mode
Step 4: Answer and end calls by pressing the Speaker / Speakerphone key (if you have multiple lines please answer by pressing pre programmed line key instead of the speaker key)
* Please note once the phone is in headset mode you can no longer answer calls with the handset or use the speakerphone . Here is a link for more programmable functions for your Mitel phone.
Programming Mitel phone to use a Corded Headset (Version 2)
Step 1: Watch This YouTube Video Link
Step 2: Answer and end calls by pressing the Speaker / Speakerphone key (if you have multiple lines please answer by pressing pre programmed line key instead of the speaker key)
4. Compatible Phones for Yealink WH6x Wireless
The following table briefly lists the tested desk phones compatible with WH6X Basic function*. For more information on compatibility with WH6X Enhanced function**
|
Model |
Brand |
Model |
|
|
WH62/63 |
Yealink |
T4XS/T4XU/T53/T53C/T5XW/T58A/VP59 (V86) T30/T30P/T31/T31P/T31G/T33P/T33G (V86) - Please note you would also need the EHS35 adapter for the headset to work on the T3x Series |
|
|
Teams T55A/T58A/MP54/MP56/MP58/VP59 (V15) |
|||
|
SfB T48S/T55A/T56A/T58A/MP54/MP56/MP58 (V9) |
|||
|
Poly |
VVX x11 (VVX 411) VVX x01 (VVX 401/501) VVX x50 (VVX 250/350/450) |
||
|
SNOM |
D765 D385 D735 |
||
|
WH66/67 |
Yealink |
T4XS/T4XU/T53/T53C/T5XW/T58A/VP59 (V86) |
|
|
Teams T55A/T58A/MP54/MP56/MP58/VP59 (V15) |
|||
|
SfB T48S/T55A/T56A/T58A/MP54/MP56/MP58 (V9) |
|||
|
Poly |
VVX x01(VVX 401/501) VVX x50 (VVX 250/350/450) |
||
|
SNOM |
D765 D385 |
Extra Units now compatible as long as you purchase the EHS60
5. Yealink Ring Settings
On Yealink headsets you can change the headset to ring in your ear and through the base of your Headset or just your Yealink desk phone, see how to do this below.
To do this you will need to get the IP address from your Yealink phone by going into the menu,
1. Press "Menu"
2. Press "Status"
3. Look down the column for the IPv4 number (sample 193.168.1.11)
4. Simply type the IPv4 Number (sample 193.168.1.11) into your PC's search engine (you may have problems with firewall settings and will have to by pass your security over that)
5. you will then see the below page,
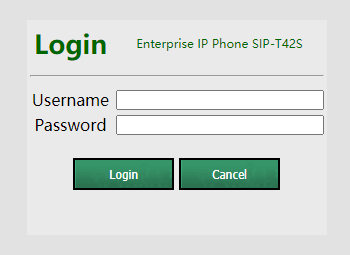
6. Enter admin for "User name" and admin for "Password" (Sometimes your internal IT department may have changed this so you will need to find out what it has been changed to)
7. Once you have got into your Yealink Settings platform you will need to Click "Features"
8. Then down the left hand side in a grey column you will need to click "Audio" (see below)

9. At the bottom of that page there is a dropdown menu titled "Ringer device for Headset", where you choose from the below options.
Option 1 "use speaker" Desk phone only will ring,
Option 2 "use headset" Headset will chime in the ear and and base of Headset will ring, Desk phone will no longer ring.
Option 3 "use Headset and Speaker" Desk phone and Headset base will ring but no chime in headset earpeice
10. Once you have made your choice simply click on "Confirm" and log out of your Yealink Platform.
Yealink WH6x Series Headsets will only work on the Yealink Phone Models Listed below, If your phone is not listed then please contact TruVoice who can help you with alternative options.
6. Upgrading Firmware on Yealink
Compatible Phone Models with Recommended Firmware Level
Firmware V86 - T3xG Series, T4xS series, T4xU series, T5xW series, T58A, VP59
Firmware V85 - T4xS series, T4xU series, T5xW series, T58A, VP59
Firmware V84 / SP4 - T4xS series, T4xU series, T5xW series, T58A
Firmware V83 - T4xS series, T5xW series
Firmware V82 - T4xS
Firmware V9 - SFB Phone Models T48S, T56A, T55A
Firmware V15 - Teams Phone Models T58A, T56A, T55A
If your phone model is listed above but your headset is not working it may be that you need to upgrade your firmware level to one of the numbers shown above. To find out what your phones firmware level is please follow the steps shown below.
- Menu
- Status
- Locate IP address(Labeled as IPv4)
- Type IP address into website browser
- The Yealink navigation street will open up and will ask for a user name and password, if a user name and password has never been set type admin into both fields to open up the phone settings
- In this screen the Firmware is clearly visible under status (eg of a firmware number is 96.85.25.2) number 3+4 is the firmware version so in this case it is 85
At this point if your firmware is below 82 or does not match the firmware levels listed above please use the following link to upgrade your Yealink telephone https://support.yealink.com/faq/faqInfo?id=9.
Once the firmware is updated make sure the phone is reset and then re-plug the headset back into the phone. If your headset is still not working after the Firmware upgrade please contact our support line at +1 888 448 5556 or you can email: support@truvoicetelecom.com
If you are using an EHS35 cable to connect your Yealink WH6 series headset to your Yealink phone please see the below tutorial.
https://www.youtube.com/watch?v=eEkxIqtThGU
7. Disabling Auto Answer on Yealink
On All Yealink WH6x Series Headsets you can change how you answer the call, please see a step by step Guide how to do this.
First click and download the Yealink USB connect page
https://www.yealink.com/product/yuc
Once the above is downloaded
Step 1. Go to device settings
Step 2. Then select Advance Settings
Step 3. Turn off "Auto Answer when undocked" (see Below)

8. Importing a CFG File for Yealink
When purchasing a Yealink WH6x series headset and connecting to the T3x Series Desk Phone with the EHS35 you may also need to import a configuration file to the T3x series phone in order for the headset to work. Please follow the steps below to do this.
Before Following these steps please make sure the phones firmware is set to V85 or above - If you are struggling to locate the Firmware Level you can contact our friendly team at 888 448 5556 who can walk you through this
1. Locate the IP address of the deskphone, this can be found on the back of the telephone.
2. Type the exact IP address into your web browser and navigate to the Yealink login section
3. Type admin (lowercase) into both sections and login
4. Navigate to Settings then to Configuration and then locate Import CFG configuration file (image shown below)
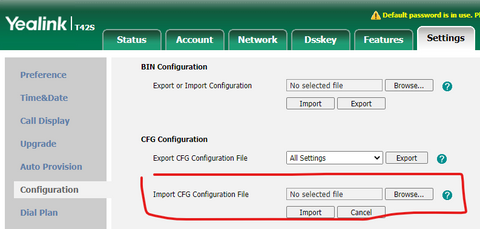
5. At this point you will need to add the CFG file to this section. If you do not already have a copy of the CFG file Please contact our support team and they will send you the file (support@truvoicetelecom.com) Once you have saved the file and added it to this section please press import.
6. Your T3x Phone will now be ready to work with the Wh6x Series Headset.
9. Setting Volume level on Polycom Phones
On Polycom Desk phones you can set your volume level to stay at that level at the end of every call, see how to do this below.
To do this you will need to get the IP address from your Polycom phone, Follow the below steps.
1. Go into the "Menu" on your Desk phone.
2. Press "Settings".
3. Press "Status".
4. Press "Network".
5. Press "TCP/IP Parameters".
6. Look down the column for the "IPv4 address" (sample 193.168.1.11)
7. Then simply type https:// and then the IPv4 number (sample - https://193.168.1.11) into your PC's search engine (you may have problems with firewall settings and will have to by pass your security over that)
8. You will then see the login Portal for Poly
9. Login as Admin and enter 789 as the "password" (sometimes your internal IT department may have changed this so if the above login does not work you will need to find out what it has been changed to)
12. Then Press on "choose file"
13. Choose file from PC (we will need to have given this to you previously so you have it stored to your PC).
14. Then press "Import"
15. Once imported log out of your Polycom phone setting portal and that volume level will be stored at a permanent level,
10. Fixing audio Screech on TruVoice headsets
To change your Headset or USB device to 16 BIT from 24 BIT (this helps eliminate any sound spikes in audio)
- Right Click the speaker Icon in bottom right of screen on taskbar and click on Troubleshoot sound problems (Make sure your USB headset / adapter is plugged in)
- Select UC USB Headset (Current Default Device)
- Select Yes, Open Audio Enhancements
- Select Advanced
- Make sure you select 16 BIT, 48000 from the drop down menu,
- Click Apply and Save Settings
Once your device is set to 16 BIT this will help eliminate audio sound spikes.
11. Retaining Volume Level on Yealink Phones
When purchasing a Yealink WH6x series headset and connecting to Yealink phones you may need to import a configuration file to the Phone to maintain the speaker volume, please follow the steps below to do this.
Before Following these steps please make sure the phones firmware is set to V85 or above - For instructions on how to check the firmware of the phone you can call 888 448 5556
- Locate the IP address of the deskphone, this can be found on the back of the telephone.
- Type the exact IP address into your web browser and navigate to the Yealink login section
- Type admin(lowercase) into both sections and login
- Navigate to Settings then to Configuration and then locate Import CFG configuration file (image shown below)

- At this point you will need to add the CFG file to this section. If you do not already have a copy of the CFG file Please contact our support team and they will send you the file (support@truvoicetelecom.com) Once you have saved the file and added it to this section please press import.
- Press Confirm
- Your Yealink phone will now retain its volume level.
Any problem performing any of these actions, please don't hesitate to call us on 888 448 5556